Thursday, September 30, 2010

*Candy Corn Wreath*

I cant wait to share with you this FUN and easy craft me and my mom worked on this weekend!  I was inspired to do the candy corn wreath from seeing the cover of Women's Day magazine. There cover story for October is this beautiful candy corn wreath, here is how I did it...........


Supplies:
  • Styrofoam wreath ( mine was 10in. and from dollar tree)
  • 2 bags of Brach's candy corn
  • roll of duct tape (black)
  • ribbon
  • hot glue gun
First cover the wreath in duct tape


Next...I started n the center and did one row at a time....I found that this was the best way to get this done quick.
Do one row going left then the next going right. see the pic below

REpeat this process till you have covered the most outer point on your wreath....
 this is what mine looked like before i put the bow on top...* don't forget to leave room @ the top for your bow!
Ta~DA!!!    My finished Candy Corn Wreath!!!!      This is my favorite craft soo far!  It was soo simple and cost only $4 to make!!!     I hope you enjoy! ;)

Sunday, September 26, 2010

*Recycling Bag*

This recycling bag is so quick to make...It will be as chic and simple as the fabric you choose...but most of all it genuinely useful- turn your billion shopping bags under your sink into a wonderful useful item!...maybe everyone in your house will be encouraged to RECYCLE!!!  ;)

Items you will need:

  • A piece of fabric, 25 1/2in. square
  • A yard of ribbon    1/4 in. wide
  • 11 3/4in. Elastic- 1/4 in.
  • Fabric Scissors
  • Pins, safety pin, sewing machine


Ok First cut your fabric 25 1/2in squared.....


Folding the fabric in half with the right sides facing and pin the longest sides together,leaving the top and bottom open

Measure 1in in from the top and bottom and mark this on the side seam. Leaving 1in @ the top and bottom unsewn, sew 1/4 in. in from the edge along the length of your fabric


Iron the seam open. Then fold and iron back 1/4 in. seam allowance on the and bottom.  this will be so your elastic and ribbon can go thru.  fold the whole top edge of the "tube" under twice using no more than 1/4in. fabric in the fold...Iron and sew down as close to the fold line as possible.
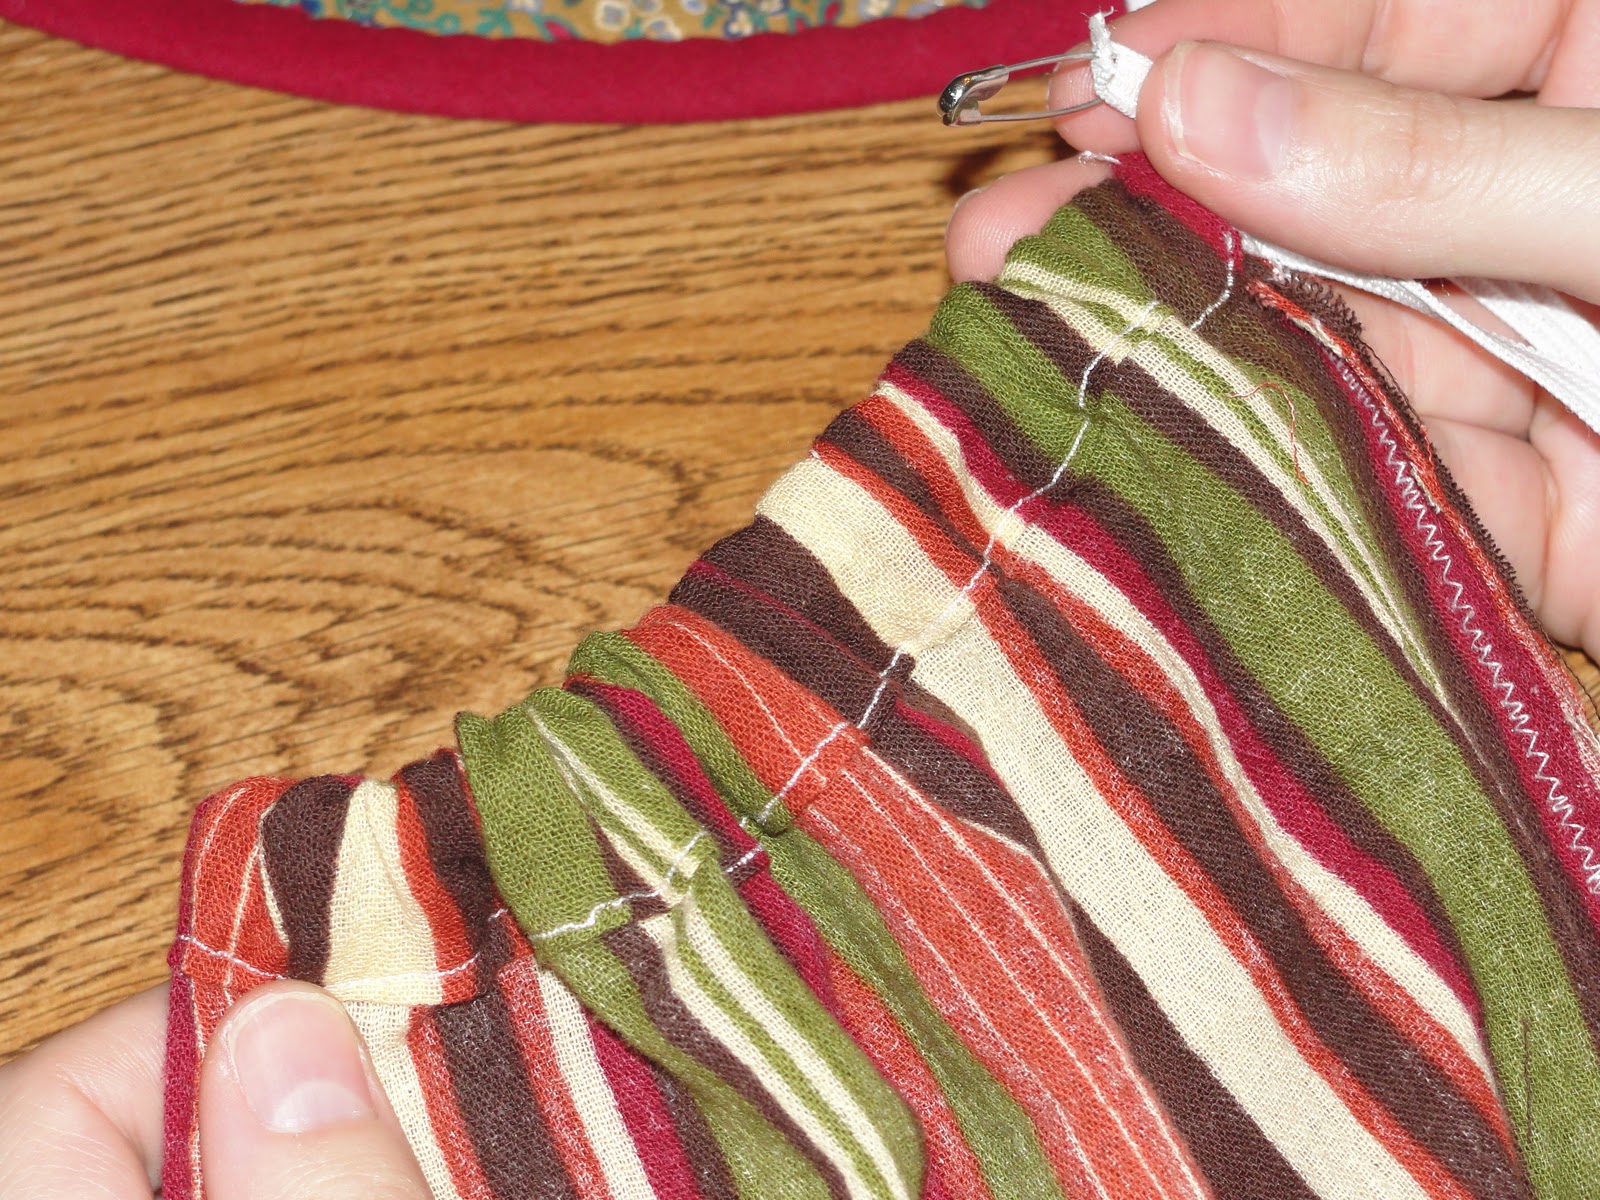
This is what it should look like......  with your safety pin attach the elastic to it and start sliding it thru.

It will look like this when you get the elastic all the way thru.

Do the same thing with your ribbon...attach the safety pin and slide it thur the "tube"

Tie the 2 ends in a knot and hang your new recycling bag on the back of your kitchen door.
And Ta Da!!!...Here is My new recycling bag!.....it goes with the coffee theme in the kitchen ;)

$6.00 @ Kirklands...clearance item ;)

Kitchen Mat   $5 @ Ross


I hope you Enjoy!!! 

Thanks Susan!! your the best helper!!  love ya!

Thursday, September 23, 2010

Felt Rosettes{Headband}

Last week I made these CUTE roses out of felt!.....My friend Maggie showed me how to make these adorable things.....I just LOVE LOVE LOVE them!     Here is the tutorial on how to make THEM!


Supplies

  • Craft felt 
  • Scissors
  • Glue (craft or hot glue or whatever you have laying around the house)
  • Headband

This is what mine looked like ;)


All you need is some felt...i got mine from hobby lobby 4/$1.00

Headband.....i got 3/$1-00 @ dollar tree!

Just cut out the felt into circles and start wrapping and gluing!

This is soooo fun and EASY!!!....I hope u enjoy! ;)

this pic is from  here ;)

Tuesday, September 21, 2010

Adding a little Flower?......

Today I went shopping and got 2 longsleeve tshirts both for only $3.00 each!!!  I needed something to show off my new fabric flowers I just made!  see what u think.....

To learn how to make these fabric flowers just click here!

                                         Just ME crafting away!!!  lol  ;)

Sunday, September 19, 2010

*Old Tshirt = Fabric Flowers*

Today I was playing around with an old black tshirt and made fabric flowers. This is so easy and cost no $$!!! Just grab a old tshirt and give it a try! ;)

I found this awesome website and watched a great tutorial.
Here is the video

 * This is what mine looked like...im thinkin of putting them on a gray tshirt or trying them on a headband?...we shall see......


Saturday, September 18, 2010

*A first for everything.....

I can't believe I am blogging!!!!  I never would of imagined myself doing this. I guess that why they say their is a first for everything.  I made this blog so i could share my crafts with everyone who shares the same interest as me! I love to craft and make things. I am so thrifty when it come to spending $$. I only buy items that are on sale. why would someone pay full price? I also love thrift shopping. Goodwill and Salvation Army are my favorite places to go! You can find so much stuff there.  I love being able to take something that people just throw away and creating it into something awesome!!!   Everyone please be patient with me because i am sooo slow and new to this whole blogging thing, hopefully i will get the hang of this and start sharing with you my crafts.
Related Posts Plugin for WordPress, Blogger...